


DesktopX Step-By-Step Tutorials #12
Stepping Thru States
Tuesday, January 13, 2009 by RomanDA | Discussion: DesktopX Tutorials
  |
|||
| Step-by-Step Tutorials |
#12 - Stepping Thru States |
||
|
A series by RomanDA |
|||
|
Listing of other DX Tutorials: Click here Today's Lesson: "Stepping Thru States" is a very simple way to setup multiple states with a button to change between them. In this lesson we will cover how to create a simple object, then add multiple states to it, and add a simple button to "step" thru the states. For this and all the Step-By-Step DX Tutorials you will need to purchase DesktopX for $14.95 from Stardock. See previous tutorials for how to load DX & create a new object. Lets get started. |
|||
| STEP 1 - Create the first object "state" | |||
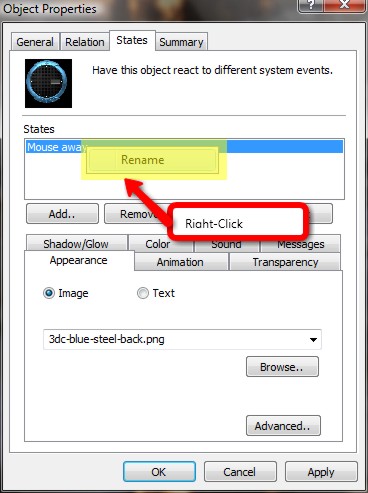
| With DX loaded and running, add a new object, goto the "STATES" tab and here we will assign the object a new image and then rename the state to "1" Browse to the 1st background image you want to use, and select it. Then use the steps below to rename the state to 1.
|
|||
| STEP 2 - Create More States | |||
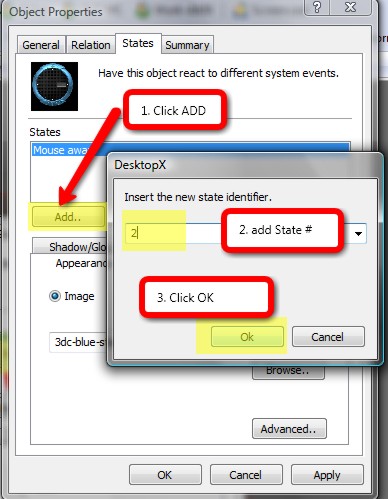 |
Add a new STATE naming it "2" and assigning it to the next background image. You would continue this for ALL the states you want to add. In our case we will make the TOTAL 8 states. Repeat - till you have all 8 states added. "OK" it all when its done. |
||
| STEP 3 - Adding the code to step thru the states. | |||
|
Edit the above object and click on "NEW SCRIPT". We will be adding the following script. Code: vbscript
|
|||
| You could also add multiple "state" changes to other objects as well (things like Clock hands, or color changes to text objects, etc. | |||
| CONCLUSION | |||
| There is a lot more you can do with this, but these are the basic steps to setting up the Stepping Object State Changer. This works great for clocks, and lots of other items where you want to have multiple looks/colors/layouts.
|
|||
 |
|
Page 2 of 2 |
|---|
Reply #22 Monday, January 19, 2009 3:46 PM
Update:
If you want to change multiple objects with 1 object/button just change the code to show:
- Function SetState()
- desktopx.object("objname1").state = CurrentState
- desktopx.object("objname2").state = CurrentState
- desktopx.object("objname3").state = CurrentState
- desktopx.object("objname4").state = CurrentState
- End Function
Where "objectname1,2,3,4" are the names of the other objects you want to change the state of.
EX: Face,MinHand,HourHand,Background etc.
If you NAME your objects "Object1" "Object2" "Object3" and so on, you could do the code like this:
- Function SetState()
- '-- 3 is the max number of objects you have
- for x = 1 to 3
- desktopx.object("objname" & x).state = CurrentState
- next
- End Function
Keep in mind that only 1 object needs the code, dont put all this code in every object.
The above tutorial is setup to use the above object as the button as well as the main code. Again, you could make 1 object a button (like i have in the above tutorial). Its always best to keep your code in one object.
Before you start messing with code, i would suggest looking over some BASIC Vbscript tutorials, and the first tutorials I created here as well. Scripting isnt hard, its about knowing what you want to do.
I hope this helps.
Keep in mind that the "State" name needs to be the same on ALL objects. If you used "1" "2" "3" then they all need to have "1" "2" "3". if one is missing a state or is named wrong the script will crash.
Reply #23 Monday, January 19, 2009 5:14 PM
Awesome David!!! It works great!! People get ready for Chameleon DX!!!! 


Reply #25 Monday, January 19, 2009 8:46 PM
glad i can help.
now.. i need to beat Zubaz in Karma.. LOL
Reply #26 Monday, January 19, 2009 8:57 PM
hehehe well you deserve some more Karma David, your Tutorials are a lifesaver, and an inspiration
Reply #27 Tuesday, January 20, 2009 1:37 AM
Chameleon DX is in moderation. It is a DX theme with 4 different styles. Just a first effort. A Bigger, better theme waits in my brain...lol.
Reply #28 Sunday, February 15, 2009 9:54 PM
Wow, Thanks for all the great tuts. I just started learning how to skin dx and these have helped out ALOT. You planning one for adding the weather info??
Reply #29 Monday, February 16, 2009 6:58 AM
Not at this time..
Please login to comment and/or vote for this skin.
Welcome Guest! Please take the time to register with us.
There are many great features available to you once you register, including:
- Richer content, access to many features that are disabled for guests like commenting on the forums and downloading skins.
- Access to a great community, with a massive database of many, many areas of interest.
- Access to contests & subscription offers like exclusive emails.
- It's simple, and FREE!
|
|
Page 2 of 2 |
|---|
Reply #21 Thursday, January 15, 2009 6:14 PM
Actually, It shouldn't use any cpu at all. It will just be a wallpaper with built in shortcuts. The problem is in keeping from accidentally using those shortcuts. Probably set to double click. But you won't be able to use it with fences, probably.