




























 |
|
Page 1 of 2 | |
|
|---|


Corky_O
Comment #5 Saturday, September 25, 2004 7:15 PM
Comment #5 Saturday, September 25, 2004 7:15 PM
Oo_NUKLEAR_oO,
Icons are as follows:
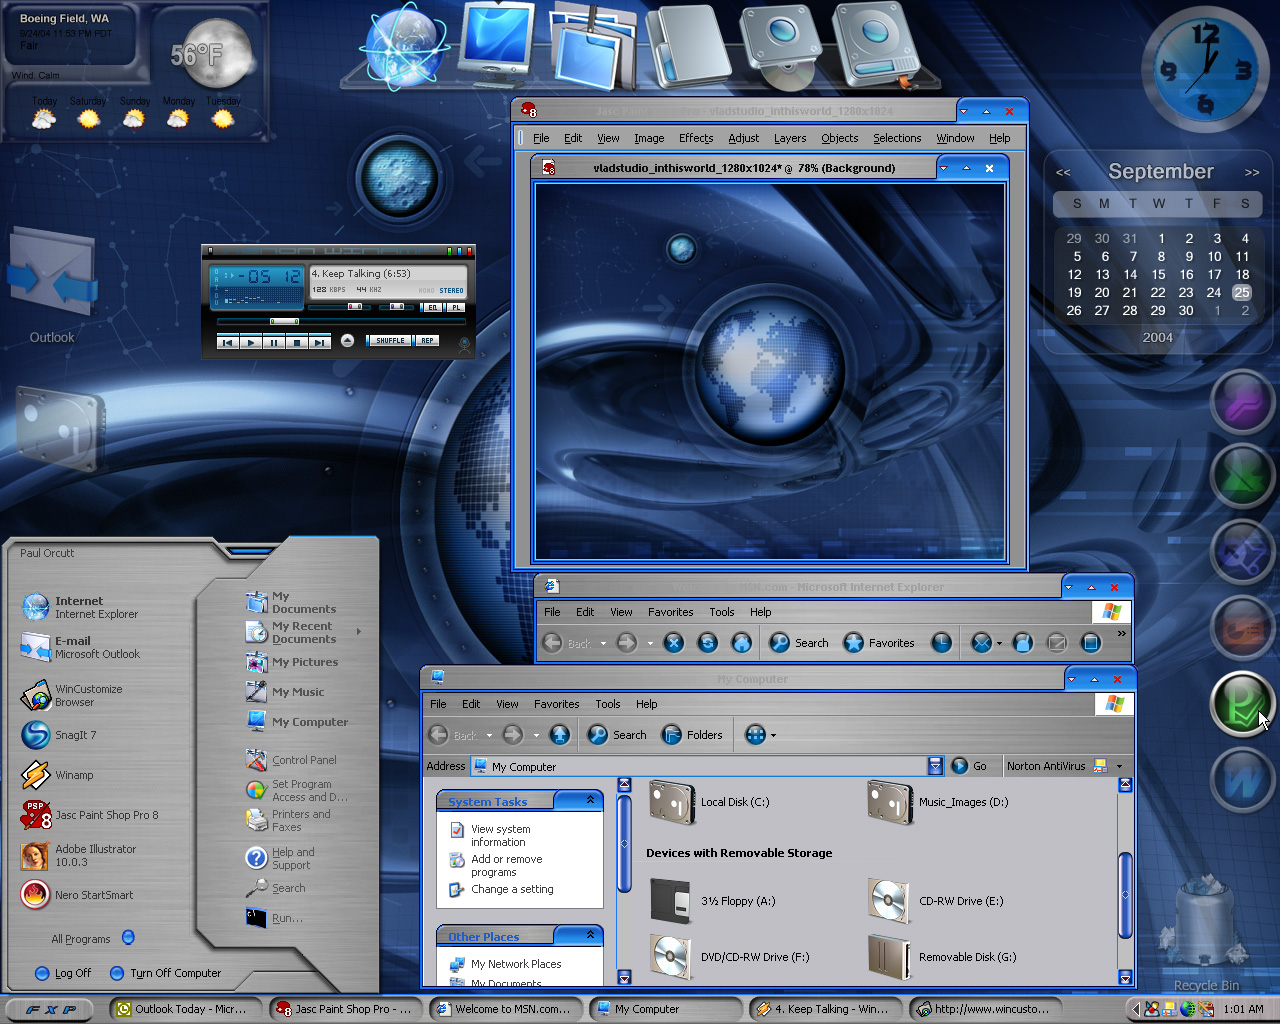
System icons are "XP-MadB" by madbwana1 and can be found here in the IconPackager library. Just type "xp" in the search and go, should be about 3rd or 4th set down.
Office icons are "K-Tek MS Office" by Tiggs and can be found in the ObjectDock library. Just type "K-Tek" in the search and go (only set that will show up).
The 3 cool icons on the right end of dock are are part of two sets of dock icons available at the following links - http://www.deviantart.com/deviation/7713842/ and, http://www.deviantart.com/deviation/7823724/
Have fun. LOL
Icons are as follows:
System icons are "XP-MadB" by madbwana1 and can be found here in the IconPackager library. Just type "xp" in the search and go, should be about 3rd or 4th set down.
Office icons are "K-Tek MS Office" by Tiggs and can be found in the ObjectDock library. Just type "K-Tek" in the search and go (only set that will show up).
The 3 cool icons on the right end of dock are are part of two sets of dock icons available at the following links - http://www.deviantart.com/deviation/7713842/ and, http://www.deviantart.com/deviation/7823724/
Have fun. LOL
jaidaksghost
Comment #6 Sunday, September 26, 2004 7:59 AM

Comment #6 Sunday, September 26, 2004 7:59 AM
sweeeeeeeeet! where do i pick up the windowblinds - if that's what it is? 


Corky_O
Comment #7 Sunday, September 26, 2004 11:40 AM
Comment #7 Sunday, September 26, 2004 11:40 AM
jaidaksghost,
It is a windowblinds and you can find it here at WinCustomize.
It is "FXP" by kona0197, just type "FXP" in search and go!
Thank you, LOL
It is a windowblinds and you can find it here at WinCustomize.
It is "FXP" by kona0197, just type "FXP" in search and go!
Thank you, LOL

Corky_O
Comment #8 Sunday, September 26, 2004 11:44 AM
Comment #8 Sunday, September 26, 2004 11:44 AM
BTW, the toolbar icons are K-Tek icons by Tiggs. Which can be found in the Toolbar Icons library.
Veni Vidi Vici
Comment #9 Sunday, September 26, 2004 3:49 PM
Comment #9 Sunday, September 26, 2004 3:49 PM
and where did you get the background/wallpaper?
jaidaksghost
Comment #10 Sunday, September 26, 2004 4:24 PM
Comment #10 Sunday, September 26, 2004 4:24 PM
thanx Corky! the wallpaper is by softshapeart http://softshapeart.deviantart.com and http://art.softshape.com/index.html vlad does great work!
the wallpaper is by softshapeart http://softshapeart.deviantart.com and http://art.softshape.com/index.html vlad does great work!
Starrlee
Comment #11 Sunday, September 26, 2004 10:35 PM
Comment #11 Sunday, September 26, 2004 10:35 PM
cool desktop where can i download your theme. I can't seem to find the download.
Corky_O
Comment #12 Monday, September 27, 2004 12:37 AM
Comment #12 Monday, September 27, 2004 12:37 AM
Starrlee,
Thank you for the interest. I wish I could claim it, but it is not my theme -rather a combination of Windowblinds, Icon Packager, Wallpaper, Object Dock and Winamp that I put together.
The Windowblinds, Wallpaper, Icon Package and dock icons are listed below in this comment area. You can use the links or instructions to download and then apply.
The dock backgrouds are listed as "Crytal trays" by Diafragma, and can be found in the ObjectDock library - type the letters as shown here in the search and go.
The DX objects are as follows:
"Aero Calendar" by Digital Chet
"Weather Objects" by Richard Mohler
"Clock" by Rami dadi
The objects can all be found in the DesktopX Objects library.
Their transparency is set to 40% opacity by loading the objects through DXconfigure dialog box. Once loaded on screen, right-click>properties and go to "states" tab, select transparency tab and select the opacity button and set to 40% - click "apply" and you should be good to go.
The Office icons were made by doing the following:
Open DXconfigure dialog (or right click the system tray icon) and select "new object" - you will end up with a dialog box and a round blue "object" button (the button may be hidden behind the dialog box).
On the general tab of dialog box, click the "change" button in the "type of object" section, this will open the "class configuration" dialog. In the dialog, do the following:
1) Select shortcut from the drop down menu.
2) Select "file menu" button and "browse" to the program .exe file you want, click to select that file.
3) Click "OK".
Return to main "Object properties" dialog if you are not there already (you should be after last "OK" click).
Now go to the "states" tab of the "Object properties. You will see a list box labeled "states" with a mouse away" state already listed.
Leave that box alone for a moment and look in the lower half of this dialog box and you will see a number of tabs.
The "appearance" tab should be selected. The following items need to be set in the "appearance" section:
1) The "image" button is selected (not text).
2) Browse to the location of office icons (or whatever you have decided on as an image) and select it to create the address path.
3) The object size is set to 72 (pixels).
[BTW, use of .ico or .png files will work for images. I used .ico files in this exercise which had 128px size included in file.]
Go to the "transparency" (to the right of "appearance" tab, and select the "make this object __ opacity", then enter 40% for a value.
Click the "Apply" button at this point.
Go back to the "states" list above and do the following:
1) Click the "add" button below this box - the new offered state should be "mouse over", accept this state and click "OK". You should now have both "mouse away" and "mouse over" listed in the "states" box.
With the "mouse over" listing selected, click the "copy from" button and the only option should be "copy parameters from mouse away state" - select this.
With the "mouse over" listing still selected, go to the "transparency" tab in the lower half of dialog box and select "no transparency".
Click the "Apply" button again, then click "OK".
You should now have an object on your screen that is 60% transparent (40% opacity) without the mouse pointer over it, and it should show it's full color and quality when you place the mouse pointer over it.
If this worked, pat yourself on the back because you are on your way to understanding the basic creation of objects.
Repeat steps as necessary to make other icon objects.
The Recycle Bin and Mail are icons managed in IconX configure dialog with the following:
1) A 110 value in the "transpareny" of both the icon and label in all but the normal "mouse over" states (which does not have "transpareny" selected.
2) Merge color unselected in all states.
3) Icon size of 94 in all states.
I apologize for the long explanation and for not being able to upload this as a theme at this time, perhaps if there is enough interest I will pursue getting all the permissions necessary to do that.
Hope this helps. 
Thank you for the interest. I wish I could claim it, but it is not my theme -rather a combination of Windowblinds, Icon Packager, Wallpaper, Object Dock and Winamp that I put together.
The Windowblinds, Wallpaper, Icon Package and dock icons are listed below in this comment area. You can use the links or instructions to download and then apply.
The dock backgrouds are listed as "Crytal trays" by Diafragma, and can be found in the ObjectDock library - type the letters as shown here in the search and go.
The DX objects are as follows:
"Aero Calendar" by Digital Chet
"Weather Objects" by Richard Mohler
"Clock" by Rami dadi
The objects can all be found in the DesktopX Objects library.
Their transparency is set to 40% opacity by loading the objects through DXconfigure dialog box. Once loaded on screen, right-click>properties and go to "states" tab, select transparency tab and select the opacity button and set to 40% - click "apply" and you should be good to go.
The Office icons were made by doing the following:
Open DXconfigure dialog (or right click the system tray icon) and select "new object" - you will end up with a dialog box and a round blue "object" button (the button may be hidden behind the dialog box).
On the general tab of dialog box, click the "change" button in the "type of object" section, this will open the "class configuration" dialog. In the dialog, do the following:
1) Select shortcut from the drop down menu.
2) Select "file menu" button and "browse" to the program .exe file you want, click to select that file.
3) Click "OK".
Return to main "Object properties" dialog if you are not there already (you should be after last "OK" click).
Now go to the "states" tab of the "Object properties. You will see a list box labeled "states" with a mouse away" state already listed.
Leave that box alone for a moment and look in the lower half of this dialog box and you will see a number of tabs.
The "appearance" tab should be selected. The following items need to be set in the "appearance" section:
1) The "image" button is selected (not text).
2) Browse to the location of office icons (or whatever you have decided on as an image) and select it to create the address path.
3) The object size is set to 72 (pixels).
[BTW, use of .ico or .png files will work for images. I used .ico files in this exercise which had 128px size included in file.]
Go to the "transparency" (to the right of "appearance" tab, and select the "make this object __ opacity", then enter 40% for a value.
Click the "Apply" button at this point.
Go back to the "states" list above and do the following:
1) Click the "add" button below this box - the new offered state should be "mouse over", accept this state and click "OK". You should now have both "mouse away" and "mouse over" listed in the "states" box.
With the "mouse over" listing selected, click the "copy from" button and the only option should be "copy parameters from mouse away state" - select this.
With the "mouse over" listing still selected, go to the "transparency" tab in the lower half of dialog box and select "no transparency".
Click the "Apply" button again, then click "OK".
You should now have an object on your screen that is 60% transparent (40% opacity) without the mouse pointer over it, and it should show it's full color and quality when you place the mouse pointer over it.
If this worked, pat yourself on the back because you are on your way to understanding the basic creation of objects.
Repeat steps as necessary to make other icon objects.
The Recycle Bin and Mail are icons managed in IconX configure dialog with the following:
1) A 110 value in the "transpareny" of both the icon and label in all but the normal "mouse over" states (which does not have "transpareny" selected.
2) Merge color unselected in all states.
3) Icon size of 94 in all states.
I apologize for the long explanation and for not being able to upload this as a theme at this time, perhaps if there is enough interest I will pursue getting all the permissions necessary to do that.
Hope this helps.

Corky_O
Comment #13 Monday, September 27, 2004 12:43 AM
Comment #13 Monday, September 27, 2004 12:43 AM
To all,
Sorry about the type-o's, I am terrible in these small text boxes.
The "Crytal trays" is correct, searching for "Crystal trays" won't do it.

Sorry about the type-o's, I am terrible in these small text boxes.
The "Crytal trays" is correct, searching for "Crystal trays" won't do it.

Starrlee
Comment #14 Monday, September 27, 2004 4:22 PM
Comment #14 Monday, September 27, 2004 4:22 PM
Hi Corky,
Thank you for all the details and explanations on how to put together this wonderful desktop. Your explanation was more than I expected and is very appreciated. I don't know much about all the programs concerning object desktop so this is going to be a challenge for me. I have never put a desktop together before, when I saw yours it looked fantastic. I hope I can follow your instructions and understand what I'm doing. I have purchased object desktop so I hope I have everything. Again thank you very much. Would it be alright to ask you for assistance if I run into a problem?
Thank you for all the details and explanations on how to put together this wonderful desktop. Your explanation was more than I expected and is very appreciated. I don't know much about all the programs concerning object desktop so this is going to be a challenge for me. I have never put a desktop together before, when I saw yours it looked fantastic. I hope I can follow your instructions and understand what I'm doing. I have purchased object desktop so I hope I have everything. Again thank you very much. Would it be alright to ask you for assistance if I run into a problem?
Corky_O
Comment #15 Monday, September 27, 2004 8:36 PM
Comment #15 Monday, September 27, 2004 8:36 PM
Starlee,
No problem.
I would be happy to help with any questions you may have.
You can ask any questions via this screenshot, even after it ceases to be the daily shot. Just go to the screenshots library and find this screenshot and enter a comment.
I will check this daily. If you can't enter a comment in the screenshots library, you can go to the message board and create a message. I will check there daily just in case.
I would suggest using the title -"Question on Blue DX Transparency" in the message board, that way I can recognize it easily.
Feel free to ask away. Any question I can't help you with should be a question others in this community can answer. This is a very helpful and fun community to learn from and to get great GUI modifications from.
The programs used in the screenshot are all available in Object Desktop suite. The only program not actually listed as part of that suite is ObjectDock, which is a free download. You can download it through your Stardock Central program - just run the program and click on the "Free Stuff" tab. You should see ObjectDock in there.
I suggest trying the free version first to see if you like it and to see if your computer gets along with it. It can be a bit demanding on the CPU and graphics when you are using the magnification (zooming effects).
If you find that you and your computer like it, ObjectDock Plus is about $15 for an Object Desktop owner and allows you to have multiple docks (both zoomer docks and tabbed docks). The free version allows one zoomer dock (which can be set to no magnification if you want the dock without the zoom effect).
Just download the Windowblinds, Toolbar Icons, and Icon Package to a folder (perhaps into "my documents") - unzip to the same folder and double click the Icons for the Windowblinds, Toolbar Icons (both should be a .wba file extension) and the Icon Packager (the Icon Packager configure dialog should open automatically, see below on procedure for icons).
For the Windowblinds, just run the Windowblinds program and select the "FPX" skin in the My Skins section (there may not be an image to select, but there should be a listing of "FPX") and click "Apply this skin now", wait a few seconds as it is applied and you are good to go.
The toolbar icons "K-Tek Icons" are handled the same way. Your computer may beep when you double click the icon, and may give some message about a file issue (not sure of the exact reason for this), but the toolbar icons will be installed into the "My Toolbars" section in the Windowblinds configure dialog.
To apply the toolbar icons, just go to the "My Toolbars" section in the Windowblinds configure dialog and select the top button "Use the windowblinds colouring settings on this skin" and also select the button below "If the skin has a toolbar icon set defined then use it, otherwise use the icon set selected below".
With those selected, scroll until you see the K-Tek icons (may appear orange, but will apply blue) - select the icons and click the "Apply changes" (found on the lower left side of dialog box).
You may have to restart your computer to get these to apply if you don't see a change right away. I am not sure why this is occasionally required, but it has always worked for me.
If you feel uncomfortable with applying the toolbar icons, you may want to wait on that and enjoy the Windowblinds with the standard toolbar icons for a while.
Double clicking the downloaded Icon Packager icon should open the Icon Packager configure dialog. Just scroll until you see the XP-MadB set, select it, click the "load" button - then click "apply". Wait a few second for it to apply and your good to go.
Wallpaper:
Just download the wall, unzip file to download folder if needed, select it and move to your My Pictures folder (or to where you save your walls). Then just right click on an open space on your desktop, select properties from menu, go to the "desktop" tab, click the "browse" button, navigate to the location you moved the wall to, select it and click "apply".
You should now have a nice wallpaper on your desktop, with a new Windowblinds skin and an Icon Package to enjoy.
Hope this helps you on your way to understanding customization using Object Desktop suite.
Let me know if you have any other questions on applying these or any of the other parts of the screenshot.
Cheers for now. LOL
No problem.
I would be happy to help with any questions you may have.
You can ask any questions via this screenshot, even after it ceases to be the daily shot. Just go to the screenshots library and find this screenshot and enter a comment.
I will check this daily. If you can't enter a comment in the screenshots library, you can go to the message board and create a message. I will check there daily just in case.
I would suggest using the title -"Question on Blue DX Transparency" in the message board, that way I can recognize it easily.
Feel free to ask away. Any question I can't help you with should be a question others in this community can answer. This is a very helpful and fun community to learn from and to get great GUI modifications from.
The programs used in the screenshot are all available in Object Desktop suite. The only program not actually listed as part of that suite is ObjectDock, which is a free download. You can download it through your Stardock Central program - just run the program and click on the "Free Stuff" tab. You should see ObjectDock in there.
I suggest trying the free version first to see if you like it and to see if your computer gets along with it. It can be a bit demanding on the CPU and graphics when you are using the magnification (zooming effects).
If you find that you and your computer like it, ObjectDock Plus is about $15 for an Object Desktop owner and allows you to have multiple docks (both zoomer docks and tabbed docks). The free version allows one zoomer dock (which can be set to no magnification if you want the dock without the zoom effect).
Just download the Windowblinds, Toolbar Icons, and Icon Package to a folder (perhaps into "my documents") - unzip to the same folder and double click the Icons for the Windowblinds, Toolbar Icons (both should be a .wba file extension) and the Icon Packager (the Icon Packager configure dialog should open automatically, see below on procedure for icons).
For the Windowblinds, just run the Windowblinds program and select the "FPX" skin in the My Skins section (there may not be an image to select, but there should be a listing of "FPX") and click "Apply this skin now", wait a few seconds as it is applied and you are good to go.
The toolbar icons "K-Tek Icons" are handled the same way. Your computer may beep when you double click the icon, and may give some message about a file issue (not sure of the exact reason for this), but the toolbar icons will be installed into the "My Toolbars" section in the Windowblinds configure dialog.
To apply the toolbar icons, just go to the "My Toolbars" section in the Windowblinds configure dialog and select the top button "Use the windowblinds colouring settings on this skin" and also select the button below "If the skin has a toolbar icon set defined then use it, otherwise use the icon set selected below".
With those selected, scroll until you see the K-Tek icons (may appear orange, but will apply blue) - select the icons and click the "Apply changes" (found on the lower left side of dialog box).
You may have to restart your computer to get these to apply if you don't see a change right away. I am not sure why this is occasionally required, but it has always worked for me.
If you feel uncomfortable with applying the toolbar icons, you may want to wait on that and enjoy the Windowblinds with the standard toolbar icons for a while.
Double clicking the downloaded Icon Packager icon should open the Icon Packager configure dialog. Just scroll until you see the XP-MadB set, select it, click the "load" button - then click "apply". Wait a few second for it to apply and your good to go.
Wallpaper:
Just download the wall, unzip file to download folder if needed, select it and move to your My Pictures folder (or to where you save your walls). Then just right click on an open space on your desktop, select properties from menu, go to the "desktop" tab, click the "browse" button, navigate to the location you moved the wall to, select it and click "apply".
You should now have a nice wallpaper on your desktop, with a new Windowblinds skin and an Icon Package to enjoy.
Hope this helps you on your way to understanding customization using Object Desktop suite.
Let me know if you have any other questions on applying these or any of the other parts of the screenshot.
Cheers for now.
LOL
Corky_O
Comment #16 Monday, September 27, 2004 8:43 PM
Comment #16 Monday, September 27, 2004 8:43 PM
I will try to get the permissions needed to upload this combination (suite) to the Suites library.
Some parts may be problematic, but I shall try.
Thank you.
Some parts may be problematic, but I shall try.
Thank you.
Veni Vidi Vici
Comment #17 Saturday, October 2, 2004 9:48 AM
Comment #17 Saturday, October 2, 2004 9:48 AM
which icons are the object dock ones again?
Corky_O
Comment #18 Saturday, October 2, 2004 2:31 PM
Comment #18 Saturday, October 2, 2004 2:31 PM
Veni Vedi Vici,
The icons are listed below in my response to Oo_NUKLEAR_oO.
The 3 icons on the left side are from the XP-MadB icon package by "madbwana1", found here at WC in the Icon Packager library.
I have Axialis IconWorkshop, so I used that programs ability to export icons as .png with transparency from the Icon Library that is found inside the icon set folder that is installed in the C:\Program Files\Stardock\Icon Packager directory by default whenever you double click the IconPackage icon to install after download.
I have found that many of the Icon Packager sets have this included in folder mentioned above by the artists.
Hope that makes sense.
The links in my response below will take you to the deviantART download link for both of the "alumiGlax" icon sets by "Proenca", which I used for the 3 icons on the right side of the dock.
Hope this helps.
The icons are listed below in my response to Oo_NUKLEAR_oO.
The 3 icons on the left side are from the XP-MadB icon package by "madbwana1", found here at WC in the Icon Packager library.
I have Axialis IconWorkshop, so I used that programs ability to export icons as .png with transparency from the Icon Library that is found inside the icon set folder that is installed in the C:\Program Files\Stardock\Icon Packager directory by default whenever you double click the IconPackage icon to install after download.
I have found that many of the Icon Packager sets have this included in folder mentioned above by the artists.
Hope that makes sense.
The links in my response below will take you to the deviantART download link for both of the "alumiGlax" icon sets by "Proenca", which I used for the 3 icons on the right side of the dock.
Hope this helps.
Corky_O
Comment #19 Saturday, October 2, 2004 3:00 PM
Comment #19 Saturday, October 2, 2004 3:00 PM
Sorry,
Path is actually:
C:\Program Files\Stardock\Icon Packager\Themes\"folder name"
Path is actually:
C:\Program Files\Stardock\Icon Packager\Themes\"folder name"
Please login to comment and/or vote for this skin.
Welcome Guest! Please take the time to register with us.
There are many great features available to you once you register, including:
- Richer content, access to many features that are disabled for guests like commenting on the forums and downloading files.
- Access to a great community, with a massive database of many, many areas of interest.
- Access to contests & subscription offers like exclusive emails.
- It's simple, and FREE!
|
|
Page 1 of 2 | |
|
|---|


![Aero11 (Vista Edition) [Theme Preview]](https://skins17.wincustomize.com/40/19/4019518/13/28337/preview-13-28337-100x75.jpg?d=1677593646.38)

Comment #1 Saturday, September 25, 2004 8:38 AM