



























One Piece At A Time: Windowblind Tutorial Part V
Putting It Together : Taskbars
Monday, March 5, 2012 by PoSmedley | Discussion: WindowBlinds Tutorials
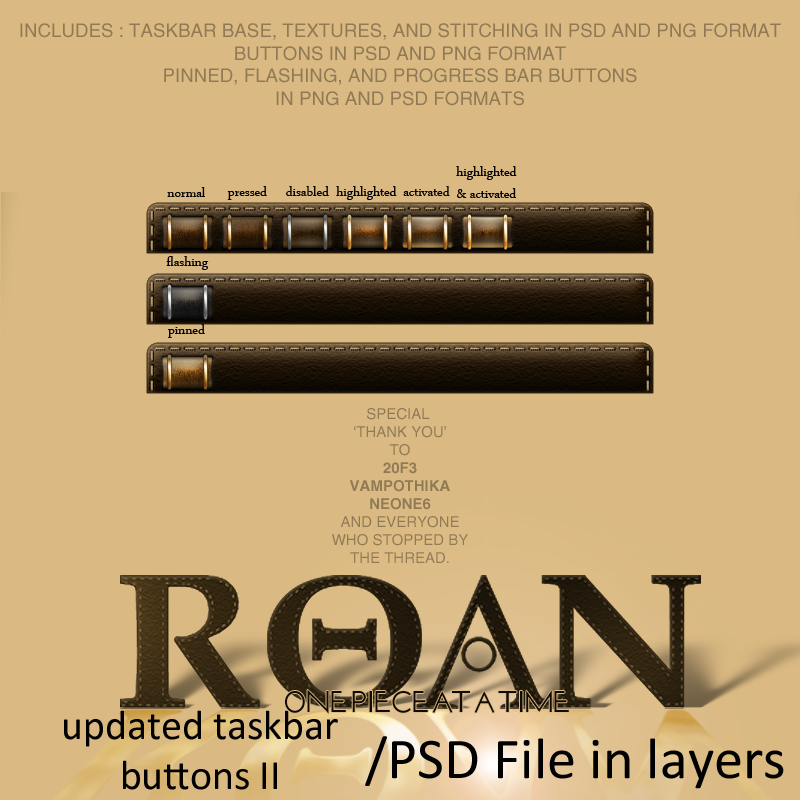
This thread will be dealing with the vertical and horizontal taskbar and all of it's components. I've had to do several redesigns to make the texture work and to accommodate the buttons. As far as the taskbars and buttons go, this should be the last (fingers crossed) redesign.
If you're looking for Part I, II, III, IV you can find them here:
One Piece At A Time : Windowblind Tutorial Part I
Design : Start Menu and Taskbar
One Piece At A Time : Windowblind Tutorial Part II
Design: Title Bars & Window Frames
One Piece At A Time : Windowblind Tutorial Part II
Design: Edit Controls
One Piece At A Time : Windowblind Tutorial Part IV
Putting It Together : Start Menu
PLEASE :
- I am open to suggestions but may not use any of them. Please, don't be offended if I don't use yours.
- Keep the image posting to the skin(s)
- If you want to make a skin to go with this, PM me for the files. My PSD's tend to be a mess, but I save everything and will be happy to share. I am uploading the actual files to the Graphics Gallery here on Wincustomize.
- We'll be skinning for Windows7, maybe Vista. If someone wants to do XP, PM me and I will get you what you need.
- Any files you request will come as I complete them. I won't be jumping ahead. Please be patient.
-----------------------------------------------------------------------------------------------------------------------------------------
The PSD files for the previous threads are in the Graphics Gallery.
Roan WB Title Bars and Window Frames
Roan WB Taskbar Buttons
ROAN WB Start Panel UPDATED
ROAN WB Start Panel Search Mode
Roan Updated Taskbar and Buttons II
 |
|
Page 2 of 4 | |
|
|---|



Reply #23 Monday, April 2, 2012 10:09 AM
I'll be getting back on the skin this week. I have appt for pre-op tomorrow. No excuses, but I have been pretty medicated and just hurting. The 'mouse' hurts my hands and I am looking for something I can work with. I just don't have the $ to drop on something that won't help or work out and I don't know what's good but I can manage some for now with what I have.
Please, hang in.
PM me any well wishes or what have you if you feel the need as I really don't want to bog the thread with a lot of drivel. 


Reply #25 Tuesday, April 3, 2012 9:06 AM
taskbar group menu thing is not needed if your skinning for windows 7 (i forgot what we are skinning, please remind me)
and skin your effing quick launch (its like eating pumpkin but do it)
oh and ps.
i am avaible for tech support if my norway friend timmers isnt.
i have a message for tim too :
Jag tycker inte om ätt kanelbulle !!!!! (its very offensive.. i wouldnt google it if i were you, im learing swedish and im picking up the most horrible and offensive things!!!)
and one more...
vill du fika??

(actually, ill be honest, my first comment was that "i dont like to eat cinnamonbuns" and the second one was "would you like to go for a coffee" very harmless.. just incase the google translate dosent work for people

Reply #26 Tuesday, April 17, 2012 12:11 PM
https://forums.wincustomize.com/415196/page/2


Reply #27 Wednesday, April 25, 2012 6:05 PM
Assuming you all still have SkinStudio open....
What???
Shut up.
Select Edit Horizontal Taskbars>Rebar Gripper
Import your image (Roan-TB-Rebar-HZ.png in the Updated Taskbar download in the Graphics Gallery)
And use the following settings :
On the Image Tab -

Then select the Painting Tab and apply the following settings -

Save Skin.
While still in the Edit Horizontal Taskbar window, select Expander under the Tray section.
On the Image Tab, select the arrow next to Edit and select Frame Builder.
In the Sub Frame Builder window, select Import Into All Frames

There are 6 frames for the Expander. You will import Roan-TB-Button-Arrow-01.png into ALL of the frames. This tells the frame builder what size each frame needs to be as they all must be the same size/dimension. After you have done this, select Import Into Selected Frame. If you are using the images from the download, they are Roan-TB-Button-Arrow-01.png thru 06.png and should be imported in that order so you see this :

Select 'Save with alpha channel' and make sure your frame count is set accordingly. Select 'Save file as'... and close the window. Be sure to have This image uses transparency selected in your Image Tab panel.
In the Painting Tab, use the following settings :

Save Skin.

Reply #29 Wednesday, April 25, 2012 6:23 PM
Now we're going to do the Quicklaunch Buttons.
I currently am unable to test them, but under advice, I went ahead and made them. We'll apply them here and IF you are following and using Vista, let me know how they work. I will try to get a saved copy of the blind to someone with Vista to check/test in the mean time.
In the Edit Horizontal Taskbar window, select Quick Launch Icon Button. We're going to be following the same steps we used to apply the Expander.
On the Image Tab, select the arrow button next to the Edit button and then select Frame Builder.
In the Sub Frame Builder window select Import Into All Frames.
Now - import Roan-QLB-02.png. This png will appear in ALL of the six states.

All the pngs for the QL Buttons are the same size. The actual images in the pngs vary in size (which you will see in the next image) I import the png whose image is the largest to make sure Frame Builder uses the same space for each state.
Now select Import Into Selected Frames. The Roan-QLB- .png's are numbered 01 thru 06 and should be imported in that order. After you import all 6 pngs, you should have what you see below.

Select 'Save with alpha channel' and make sure your frame count is set accordingly. Select 'Save file as'... and close the window. Be sure to have This image uses transparency selected in your Image Tab panel.
In the Painting Tab, use the following settings :

Save Skin.
Reply #30 Wednesday, April 25, 2012 6:39 PM
As far as the Horizontal Taskbar goes, this is all I am doing for now. I believe everything that is needed has been skinned. I'm not sure yet if I am going to stay with the Start Button that you've seen. Any other changes that are made (particularly the Quick Launch Buttons) will be updated as they happen.
What I am going to do now is move on to the Vertical Taskbar. We'll be using a lot of the parts we already applied on the Horizontal Taskbar , some with and without modifications to fit Vertical Taskbar.
Reply #31 Wednesday, April 25, 2012 7:20 PM
For the Vertical Taskbar, we will be using images from the following downloads.
Roan Update to Horizontal/Vertical Taskbar III
Roan Updated Taskbar and Buttons II
The first is the latest zip of images. The second is the collection of images we used for the horizontal TB and we will be able to use some of the same images for the Vertical.
In SkinStudio select Edit Start Menu and Taskbar>Edit Vertical Taskbar>Background.
On the Image Tab select the Arrow Button next to the Edit Button and import ROAN-Verticle-TB-vtaskbar02.png (Your taskbar background)
Use the following settings on the Image Tab:

Select the Painting Tab and apply the following settings.

Save Skin.
Reply #32 Wednesday, April 25, 2012 7:26 PM
****I should point out here that for the Horizontal and Vertical Taskbar I am not skinning the Resizing Bar. You can select this in both states of the taskbar and then select the dropdown window that lists the image used for this part, scroll to the top and select the following:


Reply #34 Wednesday, April 25, 2012 7:36 PM
Back to the Vertical Taskbar Background...
On the Image Tab, select the '+' button nest to the Layer dropdown. This will add a new layer to your taskbar background (like we did with the HZ TB). You will be adding a total of three layers. (Two for texture and the third for the 'stitching effect')

On Additional Layer 1 you will import ROAN-Verticle-TB-vtexture001.png.
On the Image Tab use the following settings:

In the drop down menu on the far right, you want to be sure you set Additional Layer -1 to what is shown in the image above (Screen Blend with automask)
On the Painting Tab use the following settings :

Save Skin.
Reply #35 Wednesday, April 25, 2012 7:40 PM
Still on the Background window, add your second layer by selecting '+' next to your layer dropdown .
On Additional Layer 2 you will import ROAN-Verticle-TB-vtexture002.png.
On the Image Tab use the following settings:

In the drop-down menu on the far right, you want to be sure to set Additional Layer-2 to the setting shown above. (Overlay Blend with automask)
On the Painting Tab use the following settings :

Save Skin.

Reply #36 Wednesday, April 25, 2012 7:47 PM
Hey! Great seeing you back at work on your project.  I hope this means you are feeling better.
Reply #37 Wednesday, April 25, 2012 7:54 PM
I'm afraid this is one bet you might lose Zubaz.
*make check payable to........* j/k 
Reply #38 Wednesday, April 25, 2012 7:55 PM
Still on the Background window, add your second layer by selecting '+' next to your layer dropdown .
On Additional Layer 3 you will import ROAN-Verticle-TB-vtexture003.png. (If you're following, the first two additional layers were the textures and this final one is the sticthing effect)
On the Image Tab use the following settings:

Leave the blending mode at Normal.
On the Painting Tab use the following settings :

Save Skin
Reply #39 Wednesday, April 25, 2012 7:56 PM
I currently am unable to test them, but under advice, I went ahead and made them. We'll apply them here and IF you are following and using Vista, let me know how they work.
To test your quicklaunch button, add a toolbar to your taskbar (I use desktop). The mouseover on the little arrows is your QL.
Reply #40 Wednesday, April 25, 2012 8:00 PM
In the Vertical Taskbar window select Rebar Gripper.
On the Image Tab select the Arrow Button next to the Edit Button and import Roan-TB-Rebar-VR.png
Use the following settings on the Image Tab:

On the Painting Tab use the following settings :

Save Skin
Please login to comment and/or vote for this skin.
Welcome Guest! Please take the time to register with us.
There are many great features available to you once you register, including:
- Richer content, access to many features that are disabled for guests like commenting on the forums and downloading skins.
- Access to a great community, with a massive database of many, many areas of interest.
- Access to contests & subscription offers like exclusive emails.
- It's simple, and FREE!
|
|
Page 2 of 4 | |
|
|---|
Reply #21 Friday, March 16, 2012 7:53 AM