






























DX Tutorial #1: Resizing an object
RomanDA's DX Tutorial Series
Friday, April 14, 2006 by RomanDA | Discussion: DesktopX Tutorials
My goal is to make a set of tutorials for DesktopX. If you have ideas on what you would like to see, please email me at [email protected]
DesktopX Object
Resizer:
Lets try this one again...
Resizing an object in DX "should" be easy but it always seems to take a lot more
effort then it should.
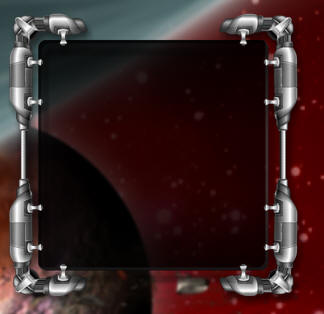 This is the "Background item" in this case its called: GalCivII-MenuBar-Graphics-Back |
We will use the resizer to
drag around and make the master object resize. The resizer object sites
on-top of the master item. I pulled a small part of the bottom right and saved it back out as "resizer". When you drag the resizer, it
changes its x/y position. ---NOTE --- |

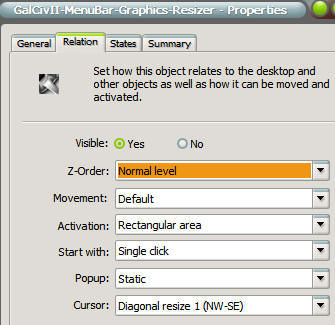 |
The
Resizer object has its "Parent/Owner" set to: It is NOT set as a CHILD object, that will not work. To make it show
the "resize arrows" you have to
|
| Lets look at the script. | |
| This is ALL inside the "resizer" there is nothing in the master obj. First lets assign some vars so we can make this work easier on other object. |
|
|
Dim Min_width, Min_height, ObTop, ObLeft, masterobj MasterObj = "GalCivII-MenuBar-Graphics-Back" '- Name of the master object Min_width = 300 'Minimum width of the master object) Min_height = 300 'Minimum height of the master object) ObTop = 39 'Offset from Bottom for Resizer ObLeft = 35 'Offset from Right for Resizer |
This part moves the resizer (it was easier to make it a sub so I could just CALL it when I needed it)
|
Sub MoveMe object.left = desktopx.Object(MasterObj).width - ObLeft object.top = desktopx.Object(MasterObj).height - ObTop End Sub |
This is called when the object is drawn so it puts it in the right place every time.
|
Sub Object_OnScriptEnter Call MoveMe End Sub |
This is the resizing, it uses "OnDrag" to reposition the resizer object, then make the master object change width/height.
| Sub
Object_OnDrag(x,y,newX,newY) newh = newY + ObTop 'Take the newY plus the top offset to get the width neww = newX + ObLeft 'Take the newX plus the left offset to get the height If neww > Min_width Then 'if the new size is greater than the min width then resize it (or stop it at the min size) DesktopX.Object(MasterObj).width = neww Else DesktopX.Object(MasterObj).width = Min_width End If If newh > Min_height Then 'if the new size is greater than the min height then resize it (or stop it at the min size) DesktopX.Object(MasterObj).height = newh Else DesktopX.Object(MasterObj).height = Min_height End If Call MoveMe 'move the resizer so its always in the right spot End Sub |
The next step would be to "hide" the inside objects and then unhide them after the resize was done. (might update this if i get a min).
CLICK HERE to download the working version of this and see how it works.
 |
Enjoy, RomanDA AKA: David A. Roman http://romanda.wincustomize.com http://www.romanda.org [email protected] |

Reply #2 Friday, April 14, 2006 4:06 PM

It looks great, but when I go to resize, it grows a bit, then shrinks to original size and moves (as if drug).


Reply #3 Friday, April 14, 2006 4:13 PM
Also, Thomas had an idea of putting a transparent box for the resizer so it wouldnt show the object moving when you resized it fast.
Will update this when i can.

Reply #4 Friday, April 14, 2006 8:24 PM
can somebody email me some smarts?
i really want to understand this stuff.

Reply #5 Friday, April 14, 2006 8:54 PM
| Thomas had an idea of putting a transparent box for the resizer so it wouldnt show the object moving when you resized it fast. |
was going to suggest this myself - I find using transparent objects very useful for a multitude of purposes
great little tutorial - showing people how do-able dx scripting really is
Reply #6 Saturday, April 15, 2006 7:24 PM
I want to include how to save the state after you size/move it as well.
Want to try and make it as generic as possible, even include some objects inside to show how to move them and resize them as well.
Reply #7 Saturday, April 15, 2006 7:26 PM
I want to include how to save the state after you size/move it as well.
Want to try and make it as generic as possible, even include some objects inside to show how to move them and resize them as well.


Reply #9 Saturday, March 3, 2007 6:28 AM
This is a deadly script by the way! RomanDA is the scripting DAddy
 .
.Ronan H
Reply #10 Tuesday, March 6, 2007 8:47 PM
check the SUMMARY tab look at the top 2 lines, LEFT/TOP, if they say anything else.. like maybe CENTER/RIGHT or BOTTOM/CENTER the position will change based on that. These are the "anchor" points in the widget.
As for:
You need to look at Vad_M's stuff.. makes me look like a noob
Please login to comment and/or vote for this skin.
Welcome Guest! Please take the time to register with us.
There are many great features available to you once you register, including:
- Richer content, access to many features that are disabled for guests like commenting on the forums and downloading skins.
- Access to a great community, with a massive database of many, many areas of interest.
- Access to contests & subscription offers like exclusive emails.
- It's simple, and FREE!
Reply #1 Friday, April 14, 2006 4:04 PM