






























DX Tutorial #4: Let's all just Fade Away
RomanDA's DX Tutorial Series
Wednesday, May 24, 2006 by RomanDA | Discussion: DesktopX Tutorials
RomanDA's DesktopX Tutorials:
My goal is to make a set
of tutorials for DesktopX. If you have ideas on what you would like to
see, please email me at
[email protected]
| Lets all just Fade Away (and BACK TOO!): | |
| How to add fading to your DX project. | |
Lets see how this would work:
| Hidden (image 1):
|
Shown: (image 2)
|

This will involve several steps.
| STEP 1: What's in your Drawers? | |
| Lets see what we have to
hide! In order to fade things in and out, we have to know what the names
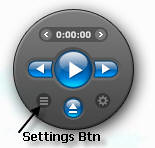
of the items we want to fade. In the case above we will use danilloOc's new DX player widget http://danillooc.wincustomize.com/ . When you click on the "Settings Button" (see image 1) it runs a script that first checks to see if the "Settings drawer" is open (shown) and if it isn't it fades it in, if it is, it fades it out. |
|
The problem is there are a lot of items in the Settings Drawer:
- Panel Back
- Repeat Btn
- Help Btn
- Shuffle Btn
- Mute Btn
- Open_folder Btn
- Close Settings Drawer Btn
I decided that its easier to make the fade in/out use an array so you only have to put the info in 1 location. And its a lot easier to add new items, or change existing ones.
| Lets
look over the example here. The DIM sets up the Vars to be read by the object. (these are put ABOVE the "Sub Object_OnScriptEnter") It saves the "count" in FadeSettingsX and the objs in FadeSettingsObj
Dim FadeSettingsObj(30), FadeSettingsX You would have to use the names that match your items. Its VERY important that the first item is the background item for the drawer (you will see why later). |
| STEP 2: I have a Fading Feeling | |
| Once you know the objects you want to fade in/out, you need to made a function that does this fading. Lets start with fading things in first. | |
| One
thing we need to do is to HIDE everything first. This is done in the OnScriptEnter Portion of our object. Sub Object_OnScriptEnter |
Now lets Fade things IN
| '-- I
made a separate function for each drawer that needed to be faded in and out. '-- It was easier for me to do this so I could call the right one based on the BTN pressed.
Function FadeIn_Settings() For x = 1 To FadeSettingsX '-- loop from 1 to the Max # of items in the array desktopx.Object(FadeSettingsObj(x)).Opacity = temp '-- set the opacity to 0 (invisible) Next '-- Loop desktopx.Object(FadeSettingsObj(1)).Visible = True '-- I said before item 1 needed to be the BG item '-- Reason is we want to control is Visibility object.SetTimer 2,50 '-- This sets a timer to fade in the items '-- The 50 is in Milliseconds want it to fade in faster make it 30 or 20 or 10 '-- Slower would be 60, 75, 100 - try them and see how they change things. End Function Sub object_OnTimer2 temp = desktopx.Object(FadeSettingsObj(1)).Opacity + 5 '-- get the BG's current Opacity, add 5 to it If temp <= 100 Then '-- if its less than or = too 100 keep going For x = 1 To FadeSettingsX '-- Loop thru the objects desktopx.Object(FadeSettingsObj(x)).Opacity = temp '-- Set the Opacity to Temp's Value Next '-- Loop Else '-- If temp > 100 IE its 100% visible now, stop the timer, and set a few more things desktopx.Object(FadeSettingsObj(1)).Visible = True '-- Set the BG's Viz top True now object.KillTimer 2 '-- Kill the timer (stop fading it in!) '-- If you don't kill this, it will continue to TRY and fade it out forever! End If End Sub |
Ok, that's the basic fading IN part, now lets show how to fade it OUT as well.
| '--
Again, Each Drawer has a Fade out/in function and timer. '-- Im not annotating every line here, look above to see what I'm doing, '-- Its basically the reverse of above.
Function FadeOut_Settings() Sub object_ontimer20 |
| STEP 3: Button, Button, who's got the.. oh heck who cares, just get on with it... | |
|
Ok, now we need to make the Buttons do the fading we just setup. Its not so bad with the functions we just created. The first button we have to work on is the "Settings Button" shown in (image 1) |
|
| Add
this code to the Button
Function Object_OnLButtonUp(x,y,dragged) |
That's all that's needed to fade the drawer in and out. You would also have to add this to the "close" button on the drawer itself.
| In Conclusion: | |
| DX code is not as hard as people make it out to be, and I feel more tutorials like this one will (I hope) help people to see what can be done with just a little code, and some ingenuity. | |
There were some other issues with particular widget.
- Since this has 2 drawers I
had to setup a test to see if the other drawer is open and fade it out, as it
fades in.
So I had to add an IF into the button code. - There was also an issue with
3 DX Plugin items (volume control items - see image 2)
Had to make them just Visible = true/false since they wouldn't fade right.
Please let me know if you find these Tutorials useful, they take a lot of time and effort to setup and I don't want them to be for my own benefit, as I can just take my own code and use it.
 |
Enjoy, RomanDA AKA: David A. Roman http://romanda.wincustomize.com http://www.romanda.org [email protected] |

Reply #2 Friday, May 26, 2006 10:19 AM
Thank you so much and I hope see more great tutorials


Reply #3 Monday, May 29, 2006 2:45 PM


Please login to comment and/or vote for this skin.
Welcome Guest! Please take the time to register with us.
There are many great features available to you once you register, including:
- Richer content, access to many features that are disabled for guests like commenting on the forums and downloading skins.
- Access to a great community, with a massive database of many, many areas of interest.
- Access to contests & subscription offers like exclusive emails.
- It's simple, and FREE!
Reply #1 Wednesday, May 24, 2006 7:37 PM